Invent Commander
Invent Commander overview

Gauges
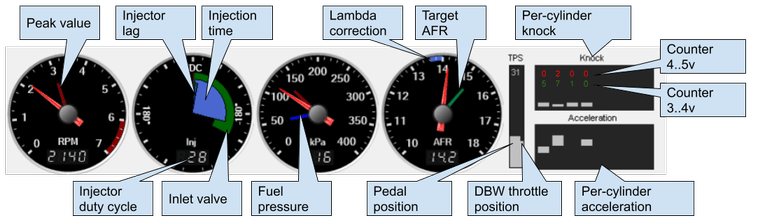
Right mouse click - reset peak indicator
Hotkeys
F1..F5 - switch first level tabs F1..F5 + 0..9 - switch second level tabs
F9 - log recorder start/stop
Ctrl + F1 - open help for current tab
Ctrl + Tab - open log viewer
Table editor
Selection
You can select one or more cells with the mouse. Hold down Ctrl to select multiple cells or ranges.
- Arrows - move the selection in the specified direction
- Ctrl + arrows - expand the selection in the specified direction
- Alt + arrows - retract the selection in the specified direction
- Shift + arrows - copy the selected cells in the specified direction
- Esc - removes the selection
Selection tracking and AFR error fixing
A long right-click brings up the context menu. You can activate selection tracking in the menu.
When tracking is activated, the cell over which the marker is currently located is automatically selected. The current cell error correction function also becomes available.
If you press the F key in the log view window or on the VE table, the system recalculates the current cell in the VE table using current AFR error value.
Changing selected cells value
- mouse wheel - small change
-
long right click - context menu
-
PgUp / PgDn - small change
- Ctrl + PgUp / PgDn - large change
- type a value - set the value of the cells
- type * and value - multiply cells by value
- type + and value - add a value to the cells
Interpolation
- I or right mouse button - interpolation by 4 bound cells
- V - vertical interpolation
- H - horizontal interpolation
RPM grid
Click on the table header and enter the desired value
Attention
Grid values should be incremental and not repeated
3D table viewer
Press the 3D button to open the 3D viewer.
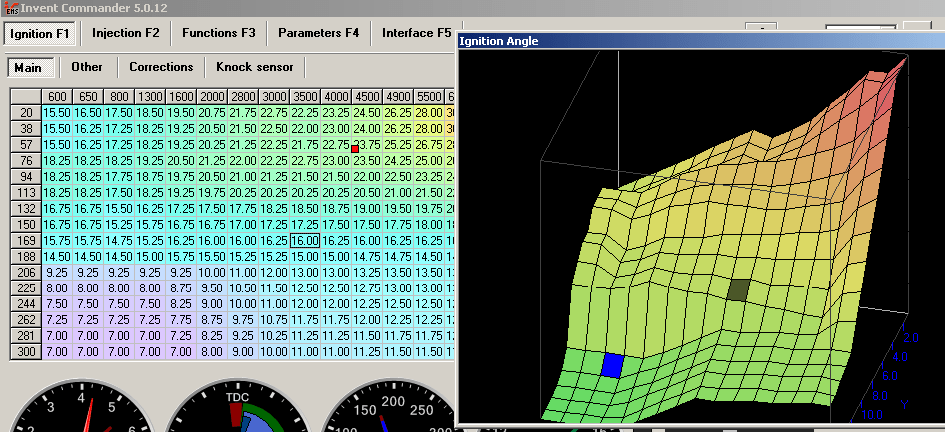
Then click on the desired table to display it in the 3D window.
Rotate and scale the image with the mouse.
Copying tables
A long right-click brings up the context menu.
- Copy table data - copies the data to the clipboard.
- Insert table data - inserts data from the clipboard.
You can also copy/paste data from another program, such as Excel.
Calibrations
Calibrations are stored in the ECU. If the ECU does not have calibrations - it cannot start the engine.
If you have made changes to the calibrations, you must write them to the ECU.
Calibrations can be saved in files. It is recommended that you save the calibrations to a file after making changes.
Info
Commander stores the history of all changes to the computer in the history folder. You can restore calibrations from the history.
When writing tables to the ECU memory, there is a short-term loss of synchronization, so autosave only works if the pressure in the manifold is below 50 kPa, to protect the engine. You need to release the throttle to store changes in the ECU.
 |
Writing to the ECU in progress |
 |
Changes are waiting for writing to the ECU |
 |
Changes are applied, but not yet written to the flash memory. You can't turn off the ignition, otherwise the changes will be lost. |
How to load calibrations from a file to the ECU
- connect to the ECU
- click Load calibrations from file and open the file
- Make changes if necessary
- press Save calibrations to the ECU
How to change the calibration in the ECU
- connect to the ECU
- make sure that the calibration is successfully read from the ECU.
- check the box Auto-save and all changes will be applied immediately
- make changes in calibrations
- Note that the AutoSave check box flashes red when saving to the ECU.
- When finished, remember to save the calibration to a file
Logs
Logs are extremely useful for engine tuning and troubleshooting. Log files are saved in the Logs folder

Log recording
- Connect to the ECU
- Press the record button, the button remains pressed, and the time counter starts.
- When finished, press the record button again, the button will be released, and the time counter will stop.
Log viewing
- Click the Open Log button and select log file.
- Press Log Viewer to open a window with graphs
- In the window, select parameters you want to see.
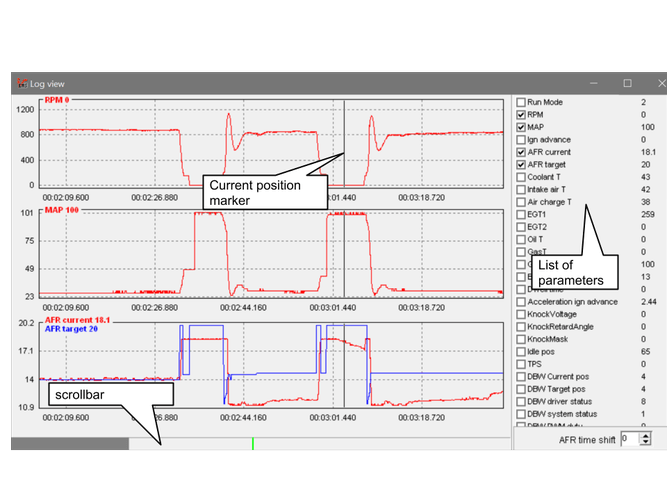
Log Navigation
Mouse
- Wheel - Zoom
- Left button - Set a marker
- Right button - Drag a chart left/rignt
Keyboard
- Up / Down, PGUP / PGDN - Zoom
- Left / Right - Scrolling
- Ctrl + Left / Right - Step-by-Step Movement of Marker
Log analyzer
It overlays log points onto the ignition and injection tables

| Knock retard | Points at which retard occured |
| Knock level higher than.. | Points at which the knock sensor signal level was higher than the specified treshold |
| AFR error | Points at which AFR error is larger than the specified treshold |
| Blink | For better visibility points will blink |
| Show all data | Displays with gray color all the points of the log |